I'd always admired some of the kits on Crusader29's website so I was psyched when I finally got around to ordering one. I chose the Command Battle Bunker. I thought it would make a nice terrain centerpiece and goal for a lot of different battlefield scenarios.
The first thing I noticed when I got the kit was that it's BIG. The bunker is a xx x xx x xx hexagon. This thing really dominates a terrain board. The second thing I noticed was that it was made of polystyrene. No big deal, but this wasn't clear from the website. Only the accessories (door, floor plate, etc.) are cast resin. What was a big deal was that the removable roof had a big gash in it (a beyond "battle damage" imperfection) and was cut much shorter than the roof shown on the box. I contacted Crusader29 via email and they were more than willing to make it right. They sent me a new roof right away and threw in a sandbag/ammo crate set (worth $12). Nice..
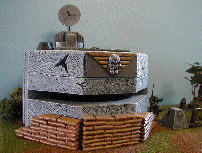
The kit comes with the polystyrene bunker and roof, a grated floor plate (and a polystyrene "foundation" to raise the floor up to the appropriate level), a large top-mounted ventilation plate, a vent outtake, a long-range comm dish, a large metal door and a giant winged-skull I.D. plate. You also get a three-piece sandbag emplacement. Everything besides the bunker, roof and foundation piece are cast resin.
As you start to work with the piece, you realize it's a "get what you pay for" casting job. Lots of the pieces had numerous bubbles (some of them very large) that needed to be fixed with Green Stuff. The base for the radar dish had a jagged chunk knocked out of it (which I did turn into battle damage). I had to spend a fair amount of time prepping the pieces before priming. I also wasn't very happy with the casting of the floor plate. The grate pattern was hit and miss, almost non-existent in some areas. At first, I didn't think I cared much 'cause I didn't have plans to detail the inside. When I did decide to do this, the plate became more of a concern.
The kit went together without a hitch. I decided to make mine look a little more sinister and dark than the normal light-gray concrete. I applied a sand/water/glue mixture (avoiding where the resin pieces would attach to the model), then primed with black acrylic. I drybrushed in layers of Codex and Fortress Gray, then drybrushed all the resin parts in Boltgun Metal, some Tin Bitz, and a light wash of Chestnut Ink for rusting.
It was at this point that I started to get carried away. I decided to place the bunker in an earthen berm (cut from styrofoam), to raise it above the battlefield and to give it steep slopes all around. For the back, where the door is, I made some deck-plate steps (from thin card and screen material) and retaining walls (from balsa). I also added some impact craters around the front by digging holes in the styro base with a hobby knife and making craters with Celluclay. I also added some hobby gravel as "ejecta" from the impacts and as added texture in random spots around the base. The craters and gravel were drybrushed in dark and light gray, with a hint of white for highlights. The berm was primed black and then drybrushed (heavily) with Beastial Brown. I then painted random areas with Goblin Green where grass might grow and added green flock (mixed mid-tone green and burnt green) to those areas. I also added a couple of pipes that were "elbow" pieces taken from a Robotix kit. Primed, drybrushed, and placed on either side of the bunker, these look fantastic. (Robotix modular building sets have highly detailed futuristic-looking parts that look amazing when painted. You can pick up old kits on eBay for a very reasonable price.) I then glued some lichen bushes here and there. I decided not to use the sandbag reinforcements on the front. They're a three-piece set that "hinges" together in such a way that some sandbags are cut in half - not realistic looking at all. I'll cut the half-bags off of each piece and use them in another project.
For the inside, I used another Robotix piece as a "Battlefield Cogitator" (previously a backpack on a spaceship/mech pilot) and a piece from a Robotix mech cockpit as a comm/radar station. I also used a ladder from a model railroad kit (to go to the hatch mounted on the roof) and snipped-off straight pins and superglued them to the ladder back to mount it to the wall of the bunker. To add a few more details, I made some blast-proof lights from tiny bulbs I had lying around and threw in a couple of the ammo crates Crusader29 had sent me with the replacement roof.
If I had it to do over again, I might choose one of the smaller bunkers (I didn't need anything quite so...ah...commanding), but all in all, I'm fairly pleased with the outcome. My finished model looks great on the battlefield and Blake and I did a fun bunker assault with it (Eldar defend, Dark Eldar attack). The little bastard beat me!
Note: Since I bought my kit at $15.99, the price has gone up three dollars.