 |
 Modeling/Conversion Tips and Tricks
| > | Click here to go to the Painting Effects Chart
| * | * |
| Vehicle Parts |
| > | Use 1/35th scale military (and sci-fi) models. |
| > | You can get Games Workshop vehicles (in-box or already assembled), plus other model kits and parts very cheaply via Ebay auctions. One way to get vehicle parts cheaply is to search out ones that are poorly painted (making them unattractive to other buyers). Once you win them, you can strip off the old paint and cannibalize for parts or repaint and use as is. |
| > | Many thrift and deep-discount stores sell model kits for super-cheap. Star Wars, Star Trek and military models found at such stores are a great source of parts. Useful stuff can be found at almost any scale. |
| > | LEGO, Robotix and other toy building system parts can be found at yard sales, thrift/discount stores and at auctions. Some pieces from these sets (especially Robotix) made great parts for 40K vehicles, buildings and terrain. | |
| Cockpit Controls and Industrial Parts |
|
> | Old computers and printers can yield an infinite number of tiny parts and wires for detailing vehicle cockpits, comm centers and for use as building materials. Inkjet cartridges are ready-made power transformers. Just flip 'em over, buzz off the raised lettering with a Dremel tool, prime black and drybrush in metallic colors and add some rust. You're done! Don't forget to plug up the ink holes on the tops, or run wires out of them. |
| > | Cockpit instruments can be added by creating them in a drawing program and reducing them to size for printing. Base the printed instrument panel on thin styrene. This method works fine on cockpits that can't really be scrutinized up close. For even more realistic controls, cover the paper controls with a piece of clear acetate and cover that with another sheet of styrene with holes drilled out to reveal the instrument displays. You'll be amazed how convincing this looks. If you don't have clear acetate, you can paint white glue over the instruments. It will dry clear. |
| > | You can also use 1/35th scale WWII instrument decals. From inside your vehicle cockpit, no one is going to be able to read the teeny letters. |
| > | Electronics solder makes great cockpit wiring. |
| Cloth Seat Covers and Safety Belts |
| > | Cloth first aid strips make very realistic seat cover material and safety belts. Just use sizes greater than the coverage you need and cut to size and fit. The cloth material responds to paint surprisingly well and looks like fabric. |
| Adding Armor |
| > | Don't spend several bucks a plate for extra Games Workshop vehicle armor bitz. You can easily make your own by cutting thin pieces of styrene sheeting (found at hobby shops) to size. Simulate weld lines around the plating with Green Stuff or auto body filler. You can even use white glue. Put a bead of glue where you want the weld lines to go. Let the glue get tacking, and then, with a small flat piece of scrap wood, push and drag it through the glue bead to simulate a weld bead. This doesn't look as good as with Green Stuff, but it's not half bad after it's drybrushed. |
| Gun Barrels |
| > | Don't sand the seam of a plastic gun barrel with a flat piece of sandpaper, it'll leave flat spots, or an uneven areas. Make a tube out of sandpaper and twist and turn the barrel inside of it. |
| > | Always drill out your gun barrels using a pin vise. It adds so much realism. For guns that have side port holes, drill these out first. |
| Reshaping Hands |
| > | It's not easy to do, but you can reshape plastic model hands by putting them in boiling water, and while the plastic is still soft, gently closing the fingers around a weapon (or whatever) with needle-nose pliers. |
| > | You can also reshape arms, hands and legs by heating them over a candle, holding the part HIGH enough that it softens, but does not melt, and then shaping it before it dries. This is not easy to do and takes practice. Cut notches on the opposite side of where you want the arm or leg to move to aid in the process. Fill any remaining gaps with Green Stuff. Practice on models you don¹t care about before you try this on models you do. |
| Creating Fur |
| > | Apply static grass to your model with white glue. When dry, apply a coat of spray matte vanish. Trim grass if necessary. THEN prime and paint to desired colors. |
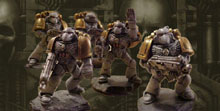
Ben Durbin's "rockin'" Beakies
| Basing Models |
| > | If you want your models to be truly unique, try basing them with real rocks! We got this tip from Benjamin Durbin of BatReps. He writes: "I buy slate from a hardware store, at about 3 bucks for a 50 lb bag -- I'm sure it's meant to be used in flower gardens or something. I don't recall the last time I bought something at the hardware store that wasn't 40K related. I use vice grips to break down the slate chunks into roughly 40k sized bases." (See Ben's awesome results above.) |
| > | Ben is also fond of basing some of his models in plain ol' American sand. He writes: "It's irregular (big grains, little grains, light grains, dark grains) so it looks great 'right out of the box.' You don't have to paint it. You don't even have to pre-paint the base. Just put glue everywhere and dunk it into the sand. And the best part is, sand is available in large quantities, for free, at your local playground. (Please do not approach the children.)" |
| > | It's amazing to us how many people follow the GW Studio party line and base their models in golf course green (a.k.a. Goblin Green). We don't think the battlefields of the 41st century would be quite that bucolic. Mixing different shades of green flocking (you can get other shades at the hobby store) and a few pieces of railroad ballast will make a much more natural-looking base. |
| > | For urban basing, you can make bricks and rubble out of Green Stuff, styrofoam, bitz, etc. You can also buy ready-made 1/35th-scale WWII rubble in some hobby stores, but it's rather expensive |
| > | If you're basing Necromunda models, for Emperor's sake, don't use grass! Use an urban motif. Sand glued onto the bases and then glue applied over the sand (to seal it) makes a durable base. Paint black and then drybrush in grays, black and other dark colors to represent the ash-laden, muck and rubble-covered floors of the underhive. |
| > | You can even use hobby ballast to represent grass. Mix fine-grain ballast with hobby sand (or fine sand from your yard). Underglue and overglue for durability. Prime black or dark green and then drybrush in different lighter shades of green to represent grass. You end up with a very durable base, which from a distance, looks like grass. |
| > | For another deathworld look, cover the base with a mixture of model train coal and iron ore (available at hobby stores) and ballast (ditto). |
| > | Use a combination of the techniques above (sand basing, hobby ballast, rubble) and combine with some static grass (sold through Games Workshop or hobby stores). |
|
|
 |
|


 ..
..